ReverseAuthの使い方 #twtr_hack
Account.frameworkで既にTwitter認証済みのACAccountを使い回してiOS側からSLRequestやTWRequestでAPIコールをしているだけであれば、必要ないのですが、どうしてもサーバにもAccsessTokenやAccessTokenSecretを渡したい場合があります。
しかしながら、ServiceTypeがTwitterの場合、ACAccountにはACCredentialがあるもののその中のoauthTokenは空っぽです。Facebookの場合は、入っています。
つまり、ACAccountStoreでのTwitter認証の場合、tokenの生データに触れることができません。
そこで必要になるのがReverseAuthになります。
詳細はこちらにかいてあります。
https://dev.twitter.com/docs/ios/using-reverse-auth
事前準備
ReverseAuthをはじめるまえに、TwitterDeveloperページにてアプリケーション登録を済ませ、コンシューマーキーとコンシューマーシークレットを取得しておいてください。

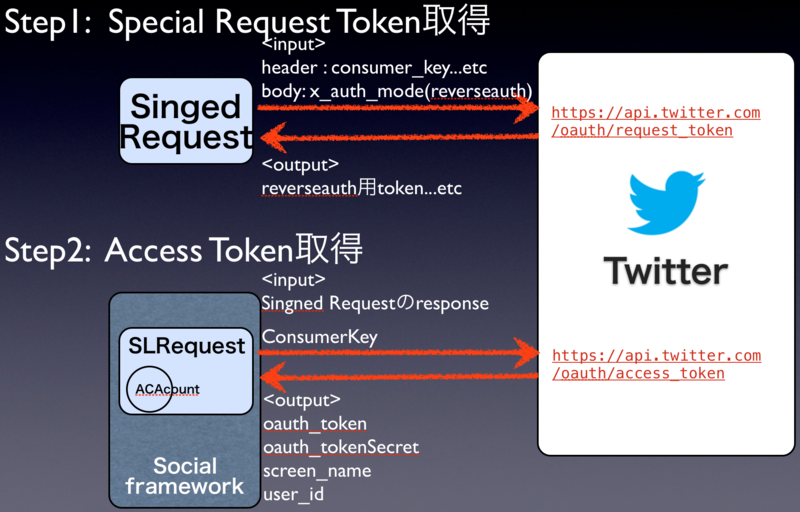
2つのリクエストをTwitterに対して投げるとトークンを取得することが出来ます。
Step1 Special Request Tokenの取得
HTTP HEADERに認証や署名情報を含んだSingedRequestをbodyにx_auth_modeをreverseauthとして
https://api.twitter.com/oauth/request_token
に対して送信すると、AccessToken取得時に使用するtoken類一式を取得できます。
Step2 Access Tokenの取得
step1で取得したresponseの内容をそのままinputとして
https://api.twitter.com/oauth/access_token
に対して送信するとoauth_token、oauth_tokenSecret、screen_name、user_id等を取得できます。
Step1 Special Request Tokenの取得(詳細)
Special Request Tokenの取得では、Singed Requestを送信する必要があります。
例えば以下のリクエストのようなヘッダを付与する必要があります。
https://dev.twitter.com/docs/auth/authorizing-request より転載
POST /1/statuses/update.json?include_entities=true HTTP/1.1
Accept: */*
Connection: close
User-Agent: OAuth gem v0.4.4
Content-Type: application/x-www-form-urlencoded
Authorization:
        OAuth oauth_consumer_key="xvz1evFS4wEEPTGEFPHBog",
              oauth_nonce="kYjzVBB8Y0ZFabxSWbWovY3uYSQ2pTgmZeNu2VS4cg",
              oauth_signature="tnnArxj06cWHq44gCs1OSKk%2FjLY%3D",
              oauth_signature_method="HMAC-SHA1",
              oauth_timestamp="1318622958",
              oauth_token="370773112-GmHxMAgYyLbNEtIKZeRNFsMKPR9EyMZeS9weJAEb",
              oauth_version="1.0"
Content-Length: 76
Host: api.twitter.com

status=Hello%20Ladies%20%2b%20Gentlemen%2c%20a%20signed%20OAuth%20request%21
作り方は以下になります。
Building the header string
To build the header string, imagine writing to a string named DST.
Append the string "OAuth " (including the space at the end) to DST.
For each key/value pair of the 7 parameters listed above:
Percent encode the key and append it to DST.
Append the equals character '=' to DST.
Append a double quote '"' to DST.
Percent encode the value and append it to DST.
Append a double quote '"' to DST.
If there are key/value pairs remaining, append a comma ',' and a space ' ' to DST.
Pay particular attention to the percent encoding of the values when building this string. For example, the oauth_signature value of tnnArxj06cWHq44gCs1OSKk/jLY= must be encoded as tnnArxj06cWHq44gCs1OSKk%2FjLY%3D.
Performing these steps on the parameters collected above results in the following string:
OAuth oauth_consumer_key="xvz1evFS4wEEPTGEFPHBog", oauth_nonce="kYjzVBB8Y0ZFabxSWbWovY3uYSQ2pTgmZeNu2VS4cg", oauth_signature="tnnArxj06cWHq44gCs1OSKk%2FjLY%3D", oauth_signature_method="HMAC-SHA1", oauth_timestamp="1318622958", oauth_token="370773112-GmHxMAgYyLbNEtIKZeRNFsMKPR9EyMZeS9weJAEb", oauth_version="1.0"
This value should be set as the Authorization header for the request.
この一連のSingnedRequestを作る処理をTwitterの中の方?がGithubにサンプルを公開してくれていますので、それを使うと凄く簡単です。
https://github.com/seancook/TWReverseAuthExample
Step2 Access Tokenの取得(詳細)
#define TW_X_AUTH_MODE_KEY                  @"x_auth_mode"
#define TW_X_AUTH_MODE_REVERSE_AUTH         @"reverse_auth"
#define TW_X_AUTH_REVERSE_PARMS             @"x_reverse_auth_parameters"
#define TW_X_AUTH_REVERSE_TARGET            @"x_reverse_auth_target"
#define TW_OAUTH_URL_REQUEST_TOKEN          @"https://api.twitter.com/oauth/request_token"
#define TW_OAUTH_URL_AUTH_TOKEN             @"https://api.twitter.com/oauth/access_token"

- (IBAction)reverseAuth:(id)sender {
    //  Step 1)  Ask Twitter for a special request_token for reverse auth
	NSURL *url = [NSURL URLWithString:TW_OAUTH_URL_REQUEST_TOKEN];

	// "reverse_auth" is a required parameter
	NSDictionary *dict = [NSDictionary dictionaryWithObject:TW_X_AUTH_MODE_REVERSE_AUTH forKey:TW_X_AUTH_MODE_KEY];
	TWSignedRequest *signedRequest = [[TWSignedRequest alloc] initWithURL:url parameters:dict requestMethod:TWSignedRequestMethodPOST];

	[signedRequest performRequestWithHandler:^(NSData *data, NSURLResponse *response, NSError *error) {
		if (!data) {
			[self dismissProgress:@"Error occurred in Step 1."];
		}
		else {
			NSString *signedReverseAuthSignature = [[NSString alloc] initWithData:data encoding:NSUTF8StringEncoding];

			//  Step 2)  Ask Twitter for the user's auth token and secret
			//           include x_reverse_auth_target=CK2 and x_reverse_auth_parameters=signedReverseAuthSignature parameters
			dispatch_async(dispatch_get_global_queue(DISPATCH_QUEUE_PRIORITY_DEFAULT, 0), ^{
				NSDictionary *step2Params = [NSDictionary dictionaryWithObjectsAndKeys:[TWSignedRequest consumerKey], TW_X_AUTH_REVERSE_TARGET,
                                                                                          signedReverseAuthSignature, TW_X_AUTH_REVERSE_PARMS, nil];
				NSURL *authTokenURL = [NSURL URLWithString:TW_OAUTH_URL_AUTH_TOKEN];

                //-- iOS5 -----
			//TWRequest *step2Request = [[TWRequest alloc] initWithURL:authTokenURL parameters:step2Params requestMethod:TWRequestMethodPOST];
                //-------------
                //-- iOS6 -----
				SLRequest *step2Request = [SLRequest requestForServiceType:SLServiceTypeTwitter
                                                                   requestMethod:SLRequestMethodPOST
                                                                             URL:authTokenURL
                                                                      parameters:step2Params];
                //-------------

				[step2Request setAccount:self.selectedAccount];
				[step2Request performRequestWithHandler:^(NSData *responseData, NSHTTPURLResponse *urlResponse, NSError *error) {
					if (!responseData || ((NSHTTPURLResponse*)response).statusCode >= 400) {
						[self dismissProgress:@"Error occurred in Step 2."];
					} else {
						NSString *responseStr = [[NSString alloc] initWithData:responseData encoding:NSUTF8StringEncoding];
                                 NSLog(@"AuthData : %@",responseStr);
 					}
				}];
			});
		}
	}];
}
サンプルアプリをGithubに置いているのでご利用ください。
該当部分は、ACAccountDetailViewControllerあたりになります。
https://github.com/i2key/SocialframeworkExample
Play2系でplayコマンド実行時にsbtが無いと言われる場合の対処法
下記のようなエラーが発生したときは、project/build.propertiesのsbtのバージョンを確認すること。
ソースは古いplayのままでframework側のsbtが新しいかもしれない。
project/build.properties内のsbtバージョンを正しいバージョンに書き換えれば動く。
$ play run
Picked up _JAVA_OPTIONS: -Xms1024m -Xmx1024m
Getting org.scala-sbt sbt 0.11.3 ...

:: problems summary ::
:::: WARNINGS
		module not found: org.scala-sbt#sbt;0.11.3

	==== local: tried

	  /Users/Shared/play-2.1-RC3/repository/local/org.scala-sbt/sbt/0.11.3/ivys/ivy.xml

	==== Maven2 Local: tried

	  file:///Users/kurodaitsuki/.m2/repository/org/scala-sbt/sbt/0.11.3/sbt-0.11.3.pom

	==== typesafe-ivy-releases: tried

	  http://repo.typesafe.com/typesafe/ivy-releases/org.scala-sbt/sbt/0.11.3/ivys/ivy.xml

	==== Maven Central: tried

	  http://repo1.maven.org/maven2/org/scala-sbt/sbt/0.11.3/sbt-0.11.3.pom

		::::::::::::::::::::::::::::::::::::::::::::::

		::          UNRESOLVED DEPENDENCIES         ::

		::::::::::::::::::::::::::::::::::::::::::::::

		:: org.scala-sbt#sbt;0.11.3: not found

		::::::::::::::::::::::::::::::::::::::::::::::


:: USE VERBOSE OR DEBUG MESSAGE LEVEL FOR MORE DETAILS
unresolved dependency: org.scala-sbt#sbt;0.11.3: not found
Error during sbt execution: Error retrieving required libraries
  (see /Users/Shared/play-2.1-RC3/framework/sbt/boot/update.log for complete log)
Error: Could not retrieve sbt 0.11.3
hatena blogのデザイン変更メモ(横幅を広げる)
hatena blogデフォルトだと横幅が狭く、ソースコード等が見難いのでカスタマイズしたのでメモ。
/* <system section="theme" selected="report"> */
@import "/css/theme/report/report.css";
/* </system> */

/* <system section="background" selected="fff"> */
body{background:#fff;}
/* </system> */

pre.code{
   font-size: 70%;
   background:#EEEEEE;
   max-height: 500px;
   white-space: pre;
   overflow: auto;
}

#container {
  width: 1200px;
}

#content {
  padding-left: 70px;
}

#main {
  width: 810px;
}
Social.framework & Account.framework
社内のスマホエンジニア勉強会で発表したのでブログにしときます。
サンプルアプリはGitHubに公開しているのでどうぞ。
https://github.com/i2key/SocialframeworkExample
最初のほうは当たり前なツイートシートとかの内容なので、試してて引っかかったところのみ掲載します。
Facebookに対してAPIコールを行う(SLRequestを使う)場合、パーミッションをFacebookの指定する順序で取得しないといけません。
基本的には以下の順にパーミッションをとる必要があります。
Step 1: Request basic profile information
ex) email, user_birthday , user_location
Step 2: Request read permissions
ex) user_about_me, read_stream
Step 3: Request publish permissions
ex) publish_actions, publish_stream
参考:https://developers.facebook.com/docs/howtos/ios-6/
そのため、最初からemail,publish_action のような組み合わせではパーミッション取得時に以下のようなエラーがでます。
The Facebook server could not fulfill this access request: The app must ask for a basic read permission at install time.
例えば、FacebookのAPIをSLRequestで叩いてウォールポストを行いたい場合。
準備として・・・
FacebookのAPP登録画面(https://developers.facebook.com/apps)にてAppIDを発行します。
・「アプリをFacebookに統合する方法を選択」にて「ネイティブiOSアプリ」のバンドルIDを入力します。
・「詳細設定」の「認証」でAppTypeを「Native/Desktop」。AppSecretinClientを「いいえ」
初めにemailのパーミッションを取得します。(上記step1)
ACAccountType *facebookType
 = [self.accountStore accountTypeWithAccountTypeIdentifier:ACAccountTypeIdentifierFacebook];
NSDictionary *options = @{
                        ACFacebookAppIdKey : @"AppID",
                        ACFacebookPermissionsKey : @[@"email"],
                        ACFacebookAudienceKey : ACFacebookAudienceOnlyMe};

[self.accountStore requestAccessToAccountsWithType:facebookType
                                               options:options
                                            completion:^(BOOL granted, NSError *error) {
        if(granted){
            //ActionSheet表示する処理
        }
}]
次にpublish_actionsのパーミッションを取得して(上記step3)、ポストします。
ACAccountStore *accountStore = [[ACAccountStore alloc] init];
ACAccountType *facebookType = [accountStore accountTypeWithAccountTypeIdentifier:ACAccountTypeIdentifierFacebook];

NSDictionary *options = @{ACFacebookAppIdKey : @"AppID",
                        ACFacebookPermissionsKey : @[@"publish_actions"],
                            ACFacebookAudienceKey : ACFacebookAudienceOnlyMe};

[accountStore requestAccessToAccountsWithType:facebookType options:options completion:^(BOOL granted, NSError *error) {
    if(granted){
        NSString *urlStr = [NSString stringWithFormat:@"https://graph.facebook.com/me/feed"];
        NSURL *url = [NSURL URLWithString:urlStr];
        NSDictionary *params = @{@"message" : @"hogehoge"};

        SLRequest *request = [SLRequest requestForServiceType:SLServiceTypeFacebook
                                                    requestMethod:SLRequestMethodPOST
                                                              URL:url parameters:params];

        [request setAccount:self.selectedAccount];
        [request performRequestWithHandler:^(NSData *response, NSHTTPURLResponse *urlResponse, NSError *error){
            NSLog(@"response:%@",[[NSString alloc]initWithData:response encoding:NSUTF8StringEncoding]);
        }];
    }
}];
これでエラーが出ずにFacebookAPIを利用したポストが出来ます。
また、上記のようにやってもどうしてもエラーが出る場合は、iPhone側の設定にて、アプリとFacebookの連携の許可を一旦解除して、再度アプリからaccountStoreにアクセスすると直る場合があります。
Amazon Linux にJenkins入れたときのメモ
yumにJenkinsリポジトリ登録してインストール
$ sudo wget -O /etc/yum.repos.d/jenkins.repo http://pkg.jenkins-ci.org/redhat/jenkins.repo
$ sudo rpm --import http://pkg.jenkins-ci.org/redhat/jenkins-ci.org.key
$ sudo yum install jenkins
cf : https://wiki.jenkins-ci.org/display/JENKINS/Installing+Jenkins+on+RedHat+distributions
HOST名/jenkinsで開けるように
/etc/sysconfig/jenkins内で
JENKINS_ARGS="--prefix=/jenkins";
<Location /jenkins>
    Order allow,deny
    Allow from all
    ProxyPass   http://localhost:8080/jenkins
    ProxyPassReverse    http://localhost:8080/jenkins
</Location>
設定後 httpdリスタート
Jenkinsのユーザ設定(デフォルトだとJenkinsになるが、任意に変えたい場合)
/etc/sysconfig/jenkins
JENKINS_USER="hogeUser" //例えばhogeUserでJenkins動かす場合
パーミッションの変更
$ chown -R hogeUser /var/lib/jenkins
$ chown -R hogeUser /var/log/jenkins
$ chown -R hogeUser /var/cache/jenkins
Jenkins strat/stop
$ sudo service jenkins start/stop/restart
Port指定してPlay!を起動するコマンド
1.2系は設定ファイルでもできるけど、ここではコマンド指定のメモ。たまに忘れるのでメモ。
Play 1.2系
play run --http.port=8080
Play 2.0系
play "run 8080"
または
sbt stage
target/start -Dhttp.port=8080
TwitterAPI勉強会で発表してきました。 #twtr_hack
8月にTwitterAPI勉強会で発表したスライドを載せていなかったので、
思い出迷子にならないように載せときます。
しかしながら、既にiOS6のSocialFrameworkが出ていたり、リバースオースも申請しないでも使えるようになったりと情報鮮度は著しく悪化しているので、参考にはなりません。
あくまで、思い出記録用。