ReverseAuthの使い方 #twtr_hack
Account.frameworkで既にTwitter認証済みのACAccountを使い回してiOS側からSLRequestやTWRequestでAPIコールをしているだけであれば、必要ないのですが、どうしてもサーバにもAccsessTokenやAccessTokenSecretを渡したい場合があります。
しかしながら、ServiceTypeがTwitterの場合、ACAccountにはACCredentialがあるもののその中のoauthTokenは空っぽです。Facebookの場合は、入っています。
つまり、ACAccountStoreでのTwitter認証の場合、tokenの生データに触れることができません。
そこで必要になるのがReverseAuthになります。
詳細はこちらにかいてあります。
https://dev.twitter.com/docs/ios/using-reverse-auth
事前準備
ReverseAuthをはじめるまえに、TwitterDeveloperページにてアプリケーション登録を済ませ、コンシューマーキーとコンシューマーシークレットを取得しておいてください。

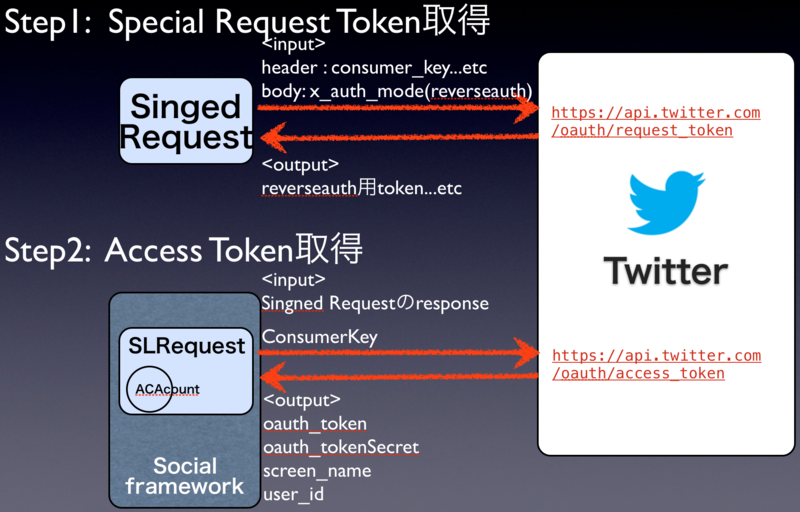
2つのリクエストをTwitterに対して投げるとトークンを取得することが出来ます。
Step1 Special Request Tokenの取得
HTTP HEADERに認証や署名情報を含んだSingedRequestをbodyにx_auth_modeをreverseauthとして
https://api.twitter.com/oauth/request_token
に対して送信すると、AccessToken取得時に使用するtoken類一式を取得できます。
Step2 Access Tokenの取得
step1で取得したresponseの内容をそのままinputとして
https://api.twitter.com/oauth/access_token
に対して送信するとoauth_token、oauth_tokenSecret、screen_name、user_id等を取得できます。
Step1 Special Request Tokenの取得(詳細)
Special Request Tokenの取得では、Singed Requestを送信する必要があります。
例えば以下のリクエストのようなヘッダを付与する必要があります。
https://dev.twitter.com/docs/auth/authorizing-request より転載
POST /1/statuses/update.json?include_entities=true HTTP/1.1
Accept: */*
Connection: close
User-Agent: OAuth gem v0.4.4
Content-Type: application/x-www-form-urlencoded
Authorization:
        OAuth oauth_consumer_key="xvz1evFS4wEEPTGEFPHBog",
              oauth_nonce="kYjzVBB8Y0ZFabxSWbWovY3uYSQ2pTgmZeNu2VS4cg",
              oauth_signature="tnnArxj06cWHq44gCs1OSKk%2FjLY%3D",
              oauth_signature_method="HMAC-SHA1",
              oauth_timestamp="1318622958",
              oauth_token="370773112-GmHxMAgYyLbNEtIKZeRNFsMKPR9EyMZeS9weJAEb",
              oauth_version="1.0"
Content-Length: 76
Host: api.twitter.com

status=Hello%20Ladies%20%2b%20Gentlemen%2c%20a%20signed%20OAuth%20request%21
作り方は以下になります。
Building the header string
To build the header string, imagine writing to a string named DST.
Append the string "OAuth " (including the space at the end) to DST.
For each key/value pair of the 7 parameters listed above:
Percent encode the key and append it to DST.
Append the equals character '=' to DST.
Append a double quote '"' to DST.
Percent encode the value and append it to DST.
Append a double quote '"' to DST.
If there are key/value pairs remaining, append a comma ',' and a space ' ' to DST.
Pay particular attention to the percent encoding of the values when building this string. For example, the oauth_signature value of tnnArxj06cWHq44gCs1OSKk/jLY= must be encoded as tnnArxj06cWHq44gCs1OSKk%2FjLY%3D.
Performing these steps on the parameters collected above results in the following string:
OAuth oauth_consumer_key="xvz1evFS4wEEPTGEFPHBog", oauth_nonce="kYjzVBB8Y0ZFabxSWbWovY3uYSQ2pTgmZeNu2VS4cg", oauth_signature="tnnArxj06cWHq44gCs1OSKk%2FjLY%3D", oauth_signature_method="HMAC-SHA1", oauth_timestamp="1318622958", oauth_token="370773112-GmHxMAgYyLbNEtIKZeRNFsMKPR9EyMZeS9weJAEb", oauth_version="1.0"
This value should be set as the Authorization header for the request.
この一連のSingnedRequestを作る処理をTwitterの中の方?がGithubにサンプルを公開してくれていますので、それを使うと凄く簡単です。
https://github.com/seancook/TWReverseAuthExample
Step2 Access Tokenの取得(詳細)
#define TW_X_AUTH_MODE_KEY                  @"x_auth_mode"
#define TW_X_AUTH_MODE_REVERSE_AUTH         @"reverse_auth"
#define TW_X_AUTH_REVERSE_PARMS             @"x_reverse_auth_parameters"
#define TW_X_AUTH_REVERSE_TARGET            @"x_reverse_auth_target"
#define TW_OAUTH_URL_REQUEST_TOKEN          @"https://api.twitter.com/oauth/request_token"
#define TW_OAUTH_URL_AUTH_TOKEN             @"https://api.twitter.com/oauth/access_token"

- (IBAction)reverseAuth:(id)sender {
    //  Step 1)  Ask Twitter for a special request_token for reverse auth
	NSURL *url = [NSURL URLWithString:TW_OAUTH_URL_REQUEST_TOKEN];

	// "reverse_auth" is a required parameter
	NSDictionary *dict = [NSDictionary dictionaryWithObject:TW_X_AUTH_MODE_REVERSE_AUTH forKey:TW_X_AUTH_MODE_KEY];
	TWSignedRequest *signedRequest = [[TWSignedRequest alloc] initWithURL:url parameters:dict requestMethod:TWSignedRequestMethodPOST];

	[signedRequest performRequestWithHandler:^(NSData *data, NSURLResponse *response, NSError *error) {
		if (!data) {
			[self dismissProgress:@"Error occurred in Step 1."];
		}
		else {
			NSString *signedReverseAuthSignature = [[NSString alloc] initWithData:data encoding:NSUTF8StringEncoding];

			//  Step 2)  Ask Twitter for the user's auth token and secret
			//           include x_reverse_auth_target=CK2 and x_reverse_auth_parameters=signedReverseAuthSignature parameters
			dispatch_async(dispatch_get_global_queue(DISPATCH_QUEUE_PRIORITY_DEFAULT, 0), ^{
				NSDictionary *step2Params = [NSDictionary dictionaryWithObjectsAndKeys:[TWSignedRequest consumerKey], TW_X_AUTH_REVERSE_TARGET,
                                                                                          signedReverseAuthSignature, TW_X_AUTH_REVERSE_PARMS, nil];
				NSURL *authTokenURL = [NSURL URLWithString:TW_OAUTH_URL_AUTH_TOKEN];

                //-- iOS5 -----
			//TWRequest *step2Request = [[TWRequest alloc] initWithURL:authTokenURL parameters:step2Params requestMethod:TWRequestMethodPOST];
                //-------------
                //-- iOS6 -----
				SLRequest *step2Request = [SLRequest requestForServiceType:SLServiceTypeTwitter
                                                                   requestMethod:SLRequestMethodPOST
                                                                             URL:authTokenURL
                                                                      parameters:step2Params];
                //-------------

				[step2Request setAccount:self.selectedAccount];
				[step2Request performRequestWithHandler:^(NSData *responseData, NSHTTPURLResponse *urlResponse, NSError *error) {
					if (!responseData || ((NSHTTPURLResponse*)response).statusCode >= 400) {
						[self dismissProgress:@"Error occurred in Step 2."];
					} else {
						NSString *responseStr = [[NSString alloc] initWithData:responseData encoding:NSUTF8StringEncoding];
                                 NSLog(@"AuthData : %@",responseStr);
 					}
				}];
			});
		}
	}];
}
サンプルアプリをGithubに置いているのでご利用ください。
該当部分は、ACAccountDetailViewControllerあたりになります。
https://github.com/i2key/SocialframeworkExample